December 23, 2025
Optimize project structure: This is how you create your own project pages in Proyex.

Having good projects doesn't always mean delivering good content. They mean more than just results. Equally important is the structure that stands behind it.
Status questions, distributed feedback, and the feeling of constantly having to explain are rarely a communication problem but almost always a structural problem.
In this article, we show you, why a clean project structure is crucial for relaxed customer projects and how you create your own project pages in Proyex, which create transparency, reduce follow-up questions, and noticeably make your daily work easier.
Missing project structure costs you more than time and nerves
The offer has been accepted, the kick-off went well, and the customer is friendly. And thus, you start motivated into the new project.
But still, after a few weeks, the same thing keeps repeating. You lose overview, and your project is ongoing, but you don’t know where it’s heading.
And your customer?
They keep checking in, constantly asking where you are, and continuously have questions. They are not doing this to annoy you on purpose but simply because they are unsure and naturally want to be up to date.
A good project structure is essential
Transparency arises from a proper structure. This gives your customer more trust in you, and you won’t constantly feel like you have to update your customer on every little detail.
Clear projects with clear project pages change the dynamics completely.
Not because you are controlling more.
But because everything becomes visible and understandable.
The customer can see at any time:
what is completed
what is currently happening
what’s next
You explain less, appear more confident, and work more relaxed. Structure is therefore not an extra step in the project. It is the foundation for good collaboration.
Proyex as a central point of contact
Proyex is a project management tool that serves as a central place where your project becomes understandable for all involved. You have various features:
Dashboard
Tasks
Projects
Digital delivery
Templates
Media library
Chat
Time tracking
Public area
And information is easily bundled with:
Project status
Tasks and phases
Files
Feedback and approvals
Everything is where you would expect it.
And above all: easily understandable for clients, without you having to explain all the time. This is because clients also have access to the platform and the joint project. They only see what they are supposed to see and do not have access to the entire project tool.
How Proyex works GDPR-compliantly and why data protection doesn’t have to be a stress factor, you can discover here: “Data protection without stress: Everything about GDPR.”
A central project page noticeably changes the project
As soon as you work with a central project page, the collaboration changes significantly:
Clients know at all times where the project stands
next steps are clear
follow-up questions decrease
decisions are made faster
You communicate no longer about the project, but in the project.
Creating your own project pages in Proyex: Step by step
The first impression matters, even in the project. That’s why we show you here how to create project pages neatly, so that your client also has an overview.
Step 1: Create a project and name it clearly
Under the Projects tab, you can easily create a new project with a click. You can choose whether to rely on an existing project template or start with a blank project, which you design according to your own wishes.
For a blank project, give it a clear name, a description, and a start date.

Step 2: Divide the project into meaningful phases
Once the first step is done, your project is ready. Now it’s about dividing your project into clear project phases. This helps your clients better understand the progress:
What is completed?
Where are we standing currently?
What comes next?
Typical phases may include:
Kick-off and planning
Concept and designs
Implementation
Review and handover
You thus create structure without unnecessarily complicating things.
This is done under the Tasks tab. You can also import a template. This is particularly useful for projects whose structures are repeated.
How to strategically use project templates to save time on every assignment can be found here: “Efficiently use project templates: This saves you time on every assignment.”
Project phases are often also referred to as milestones. If you want to learn more about this, feel free to read: “What is a milestone in client projects?”
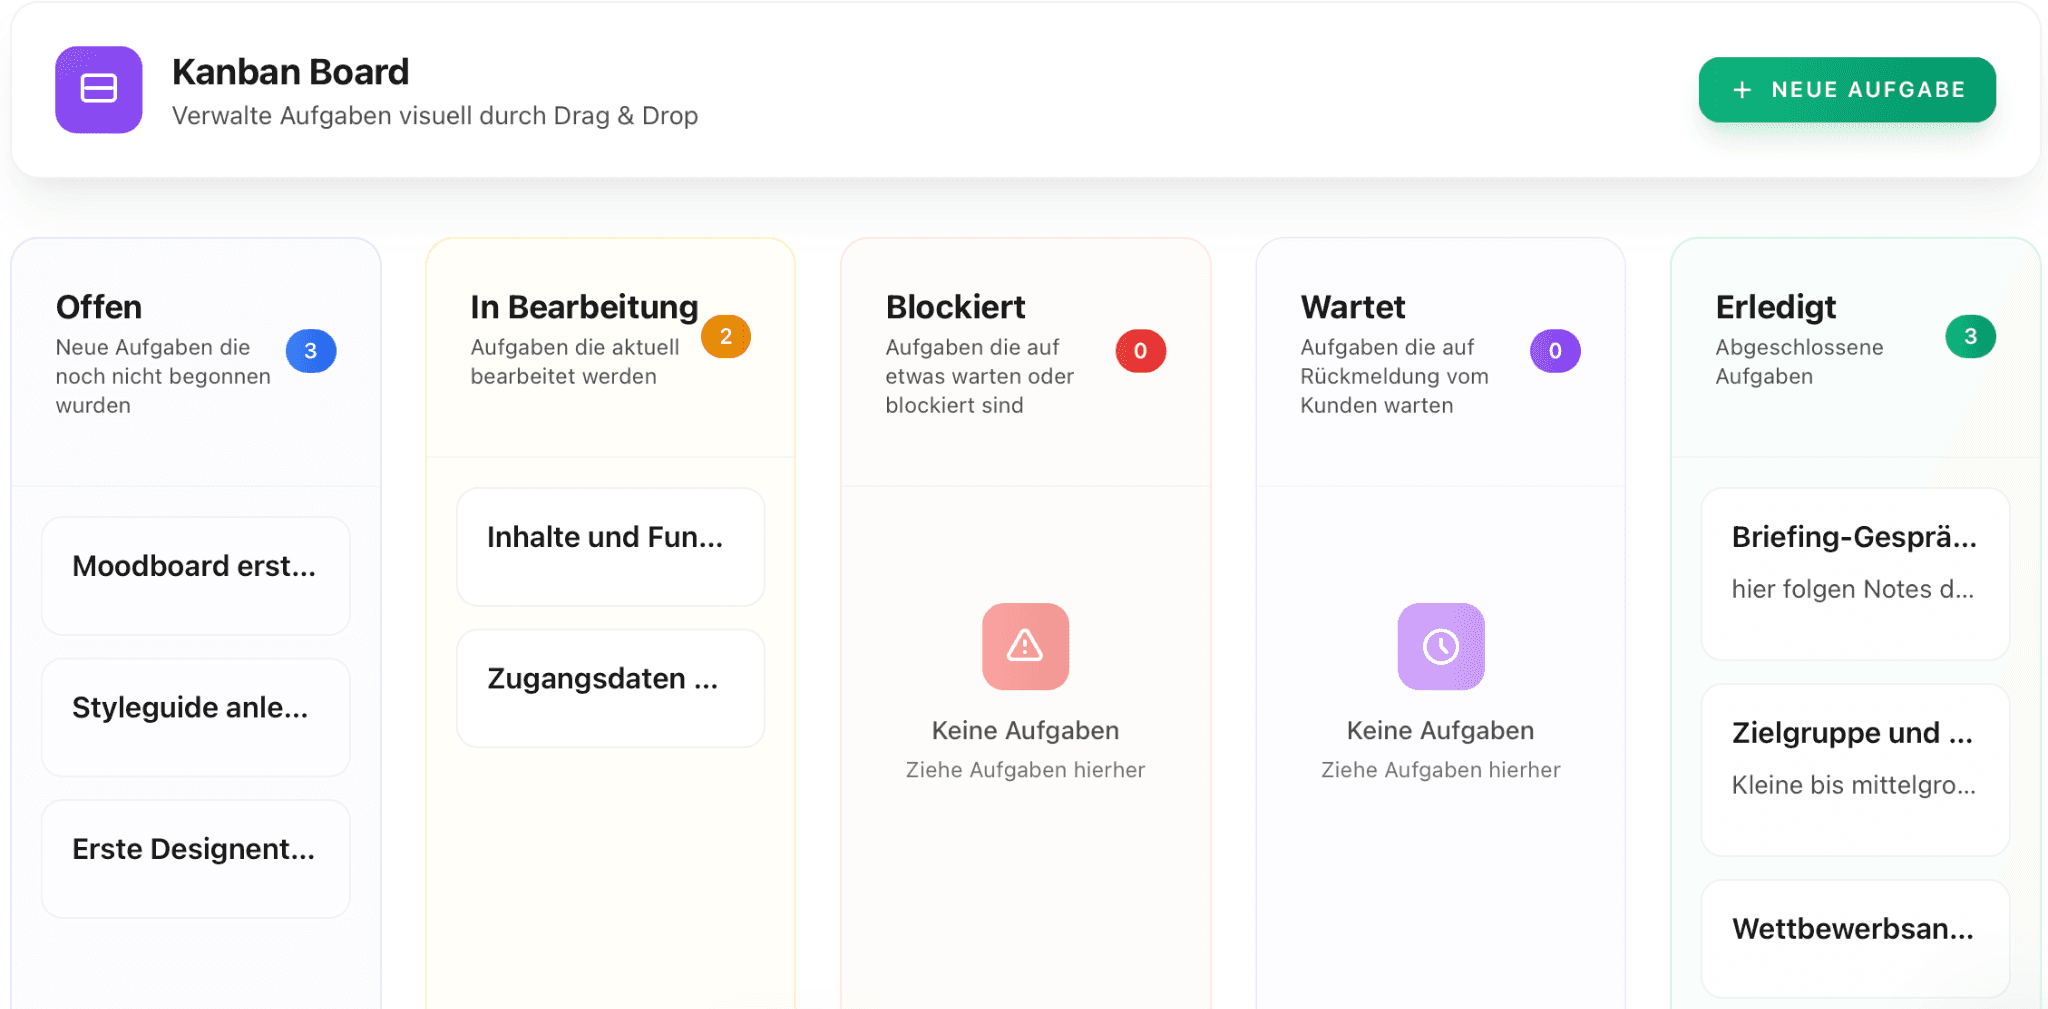
Step 3: Clearly illustrate tasks and content
Within the project phases / milestones, you create specific tasks. You can describe these in more detail and assign a clear status so that you know whether they are “Open”, “In progress”, “Completed”, “Blocked”, or “Waiting”
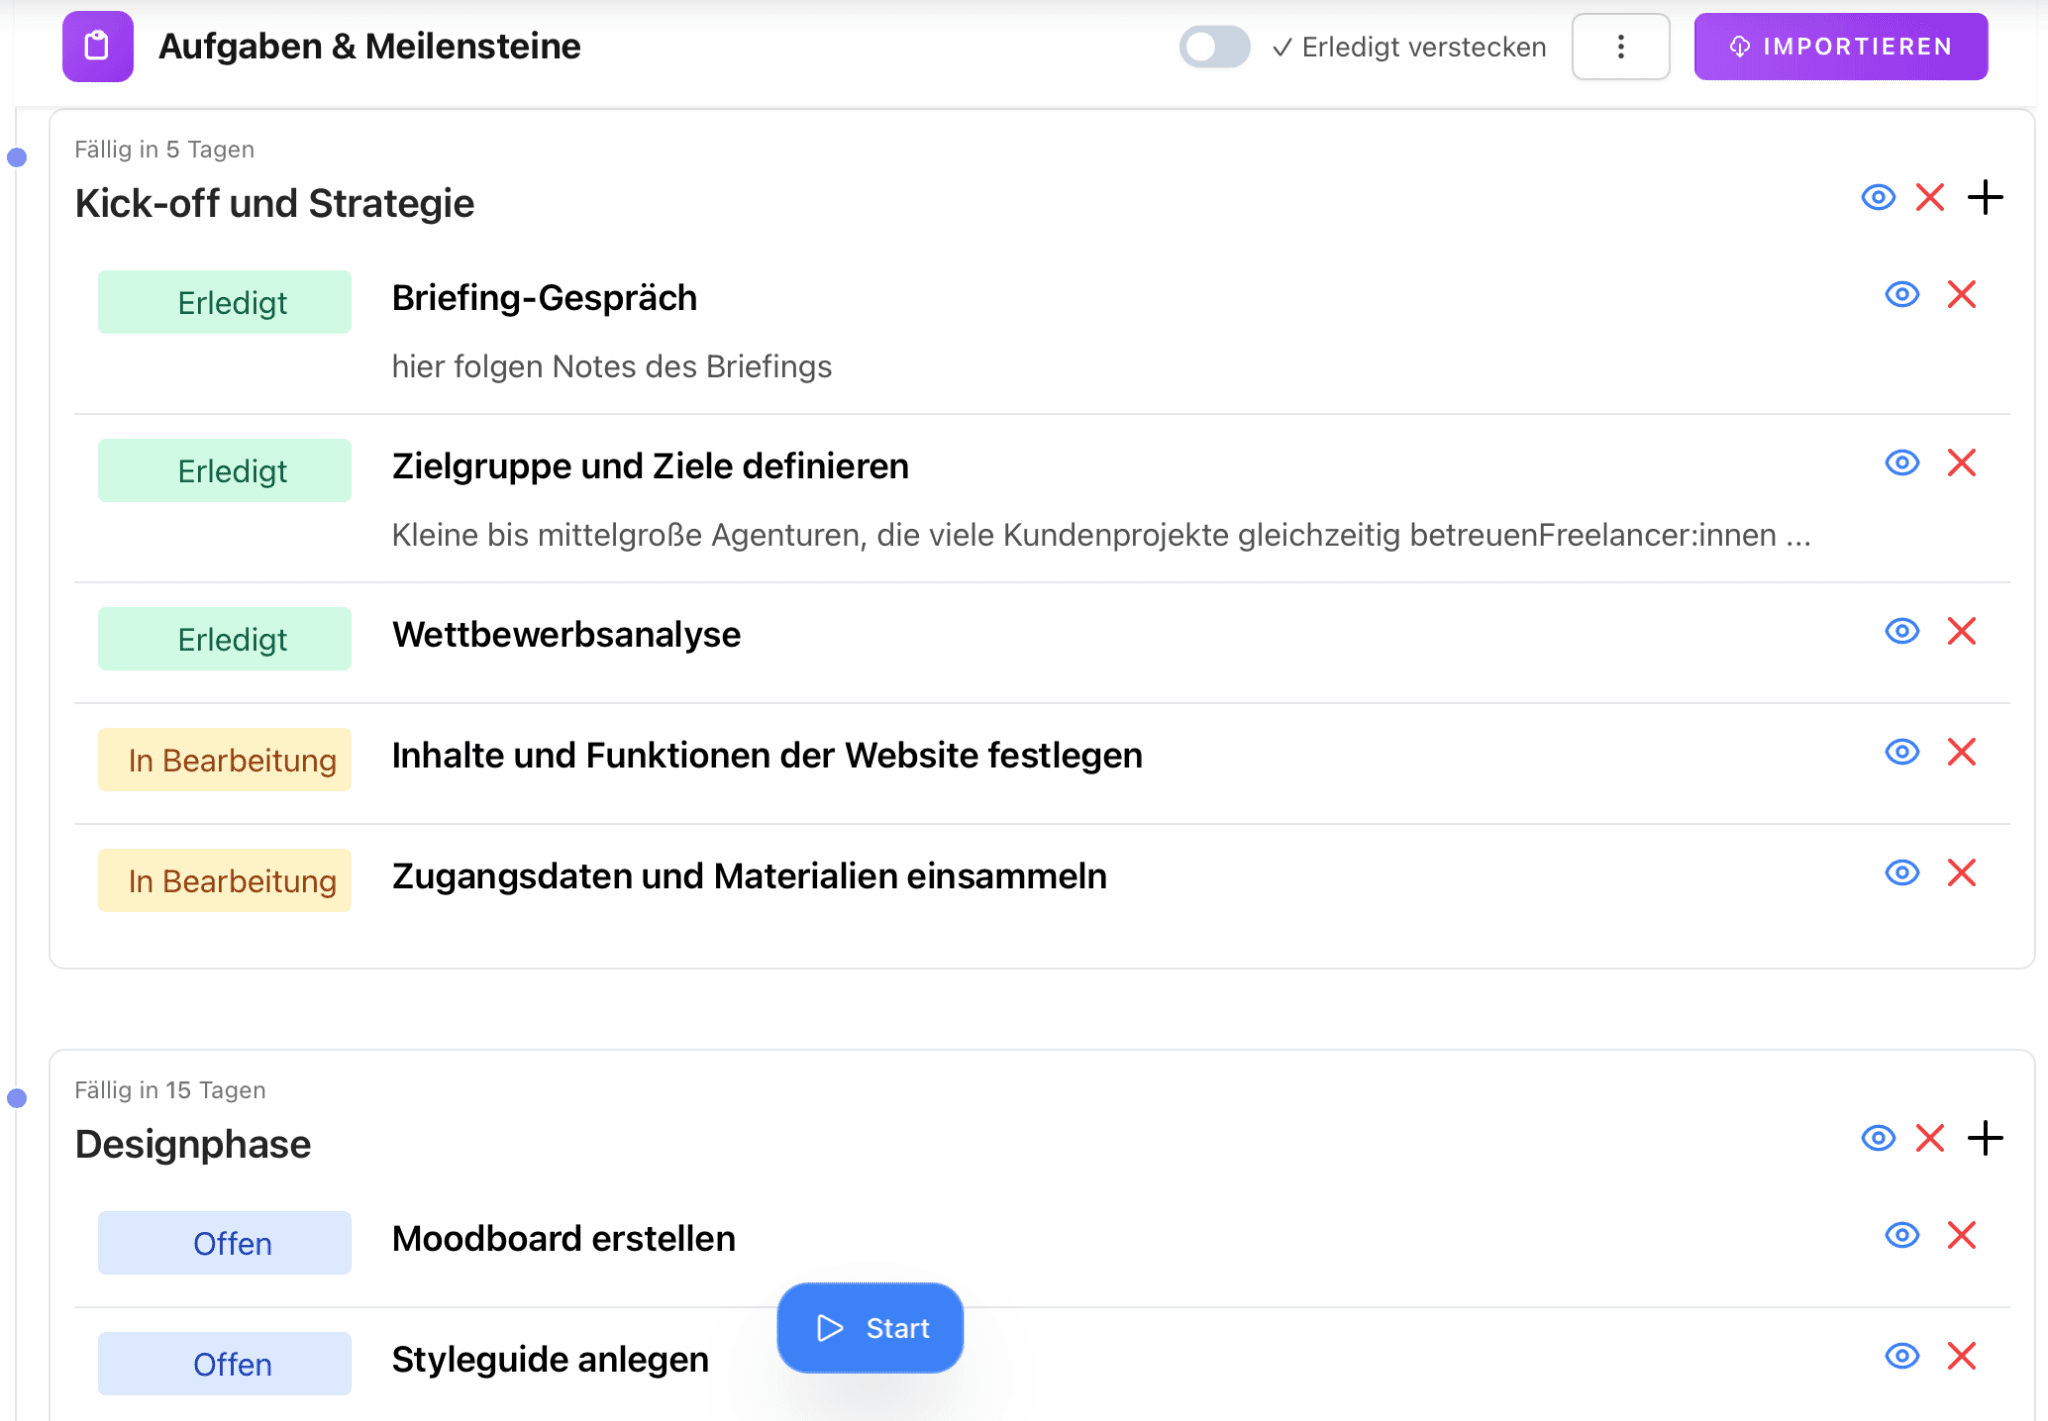
Your client also sees this structure and can mark which phase they are in when they have tasks themselves.
The overview serves as a real workspace and can also be displayed as a Kanban board or table.
If you’re wondering how tasks, subtasks, and clear responsibilities interact, feel free to read more here: “Task vs Subtask: Simply explained for your project management”.
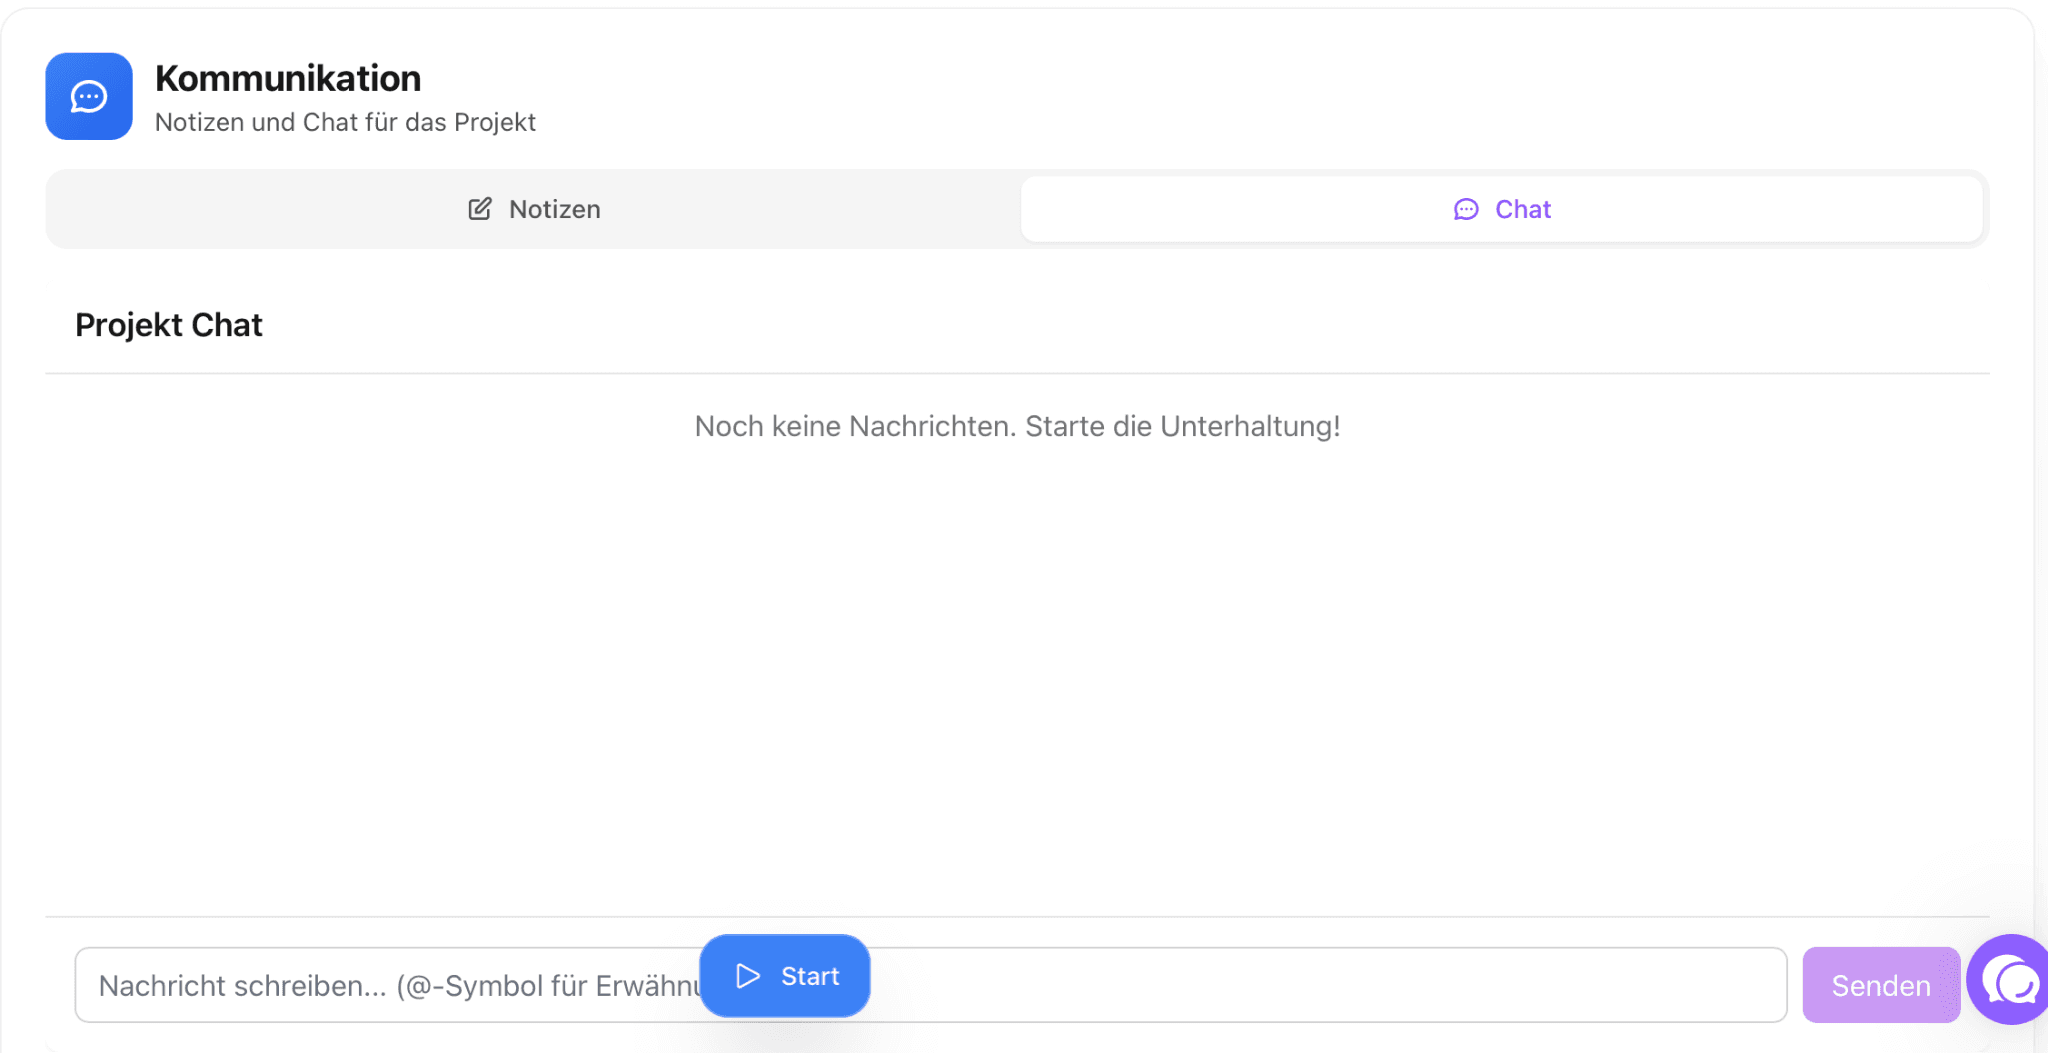
Step 4: Actively use the project page for communication
The project page is not only there for orientation but becomes the basis of your collaboration.
Under the Revisions tab, you can add digital deliveries, which your client will be notified about. They can view them, accept or reject them, and write feedback on them. This saves you from using third-party services that would be involved in feedback loops. Everything stays in the tool, and you see when what was commented on and approved so you have a proper overview.
Moreover, you have a chat function on the project page for other communications. You no longer need to communicate via email, WhatsApp, and the like, but have everything in one tool.
Project pages are not an extra but part of your way of working
In the end, it’s not about using as many features as possible or depicting projects “perfectly”. It’s about creating a clear foundation for collaboration.
What’s important for you is that you can simply focus on the essentials for which you were hired. A central project page is therefore not an additional effort but a tool that takes work off your hands in the long term.
Conclusion: Clear project pages for relaxed collaboration
With Proyex, you create project pages that not only bring order internally but also appear professional externally. Above all, you bring transparency to your processes and ensure that your clients feel taken care of without needing to ask constantly.
Log in directly and create your first project page in just a few minutes.
Free task management?
Use the free version of Proyex without time limits. Try it out now and organize your tasks like over 100 other teams with Proyex.


📩 Save 10% on your first Proyex plan.
Sign up for our newsletter and stay up to date – with tips, updates & exclusive offers.